

代码拉取完成,页面将自动刷新
efTool是一个功能丰富且易用的兼容API11的OpenHarmony/HarmonyOS工具库,通过诸多实用工具类的使用,旨在帮助开发者快速、便捷地完成各类开发任务。
这些封装的工具涵盖了字符串、数字、集合、JSON等一系列操作,
可以满足各种不同的开发需求。本人为Java开发,故封装思路借鉴Java的工具类Hutool,同时扩展了HarmonyOS的UI组件。
eftool = Efficient + Tool,Efficient是高效的表示,Tool表示工具。
eftool既是一个工具集,也是一个知识库,我从不自诩代码原创,大多数工具类都是搬运而来,因此:
一个OpenHarmony/HarmonyOS基础工具类,组成各种Util工具类,同时提供以下五部分组件:
| 模块 | 介绍 |
|---|---|
| IdCardUtil | 提供对身份证校验系列方法 |
| IdUtil | 提供生成ID的一系列方法 |
| ArrayUtil | 提供对集合的一些常用的方法 |
| DateUtil | 提供对日期的一系列封装 |
| ObjectUtil | 提供对于对象的系列操作方法 |
| RandomUtil | 提供随机数的系列方法 |
| RegUtil | 提供对于常用正则表达式的方法 |
| StrUtil | 提供对于字符串的操作方法 |
| PhoneUtil | 提供常用的手机座机等判断 |
| OutDTO | 提供常用的返回实体对象 |
| CharUtil | 提供常用的字符操作 |
| CacheUtil | 提缓存数据并且提取数据操作 |
| Logger | 提供常用的打印日志的方法 |
| RegexConst | 提供常用的正则表达式常量 |
| DateConst | 提供常用的日期格式化表达式常量 |
| AuthUtil | 提供判断授权拉起授权的系列方法 |
| 模块 | 介绍 |
|---|---|
| RSA | 提RSA供生成密钥加解密验签等系列方法(基于HarmonyOS API) |
| AES | 提供AES生成密钥加解密等系列方法(基于HarmonyOS API) |
| DES | 提供3DES生成密钥加解密等系列方法(基于HarmonyOS API) |
| SM2 | 提供SM2生成密钥加解密等系列方法(基于HarmonyOS API) |
| SM3 | 提供SM3生成摘要,HMAC等系列方法(基于HarmonyOS API) |
| SM4 | 提供SM4生成密钥加解密等系列方法(基于HarmonyOS API) |
| SHA | 提供SHA生成摘要,HMAC等系列方法(基于HarmonyOS API) |
| MD5 | 提供MD5生成摘要等系列方法(基于HarmonyOS API) |
| ECDSA | 提供ECDSA签名验签等系列方法(基于HarmonyOS API) |
| ECDH | 提供ecdh动态协商密钥系列方法(基于HarmonyOS API) |
| X25519 | 提供x25519动态协商密钥等系列方法(基于HarmonyOS API) |
| 模块 | 介绍 |
|---|---|
| efAxiosParams | 提供eftool封装axios请求所需的参数 |
| efAxios | 二次封装axios的产物,提供统一请求响应拦截等 |
| efClientApi | 提供针对于统一post,get,delete,put等请求封装 |
| 模块 | 介绍 |
|---|---|
| JSONValue | 提供eftool中的JSON相关对象的类型定义 |
| JSONObject | 提供类Java的JSON对象的系列方法以及相互转换 |
| JSONArray | 提供类Java的JSON数组的系列方法以及相互转换 |
| JSONArrayList | 提供类Java的JSON数组的系列方法以及相互转换 |
| JSONUtil | 提供JSON转换一系列判断方法,废弃一部分方法 |
| 模块 | 介绍 |
|---|---|
| ToastUtil | 提供对文本提示的一系列方法 |
| DialogUtil | 提供对弹出框的一系列方法 |
| ActionUtil | 提供对操作菜单的一系列方法 |
| LoadingUtil | 提供全局加载工具类 |
| TipsUtil | 提供提示弹出工具类 |
| SelectUtil | 提供选择弹出工具类 |
| ConfirmUtil | 提供信息确认弹出工具类 |
| AlertUtil | 提供操作确认弹出工具类 |
| ExceptionUtil | 提供省市区级联选择组件 |
| Cascade | 提供省市区级联选择组件 |
| ImmersionUtil | 提供沉浸式导航设置 |
| WindowUtil | 提供窗口的创建关闭等功能 |
| NotificationUtil | 提供发送,删除通知等功能 |
| LocationUtil | 提供获取定位,逆编码等功能 |
| DownloadUtil | 统一的上传下载按钮工具 |
| PickerUtil | 调起选择文件、照片、音频等工具类 |
| CameraUtil | 调起拍照工具类 |
| WinDialogUtil | 窗口方式弹框工具类 |
| PreviewUtil | 预览工具类 |
执行安装命令
ohpm install @yunkss/eftool
import { CacheUtil, OutDTO, Logger, IdCardUtil, ToastUtil, ActionUtil, DialogUtil ,xxxx} from '@yunkss/eftool'
类按需引入,项目需要使用那个就引入
   /**
   * 排列顺序从左至右依次为:六位数字地址码,八位数字出生日期码,三位数字顺序码和一位数字校验码。
   * 顺序码: 表示在同一地址码所标识的区域范围内,对同年、同月、同 日出生的人编定的顺序号,顺序码的奇数分配给男性,偶数分配 给女性。
   * <li>第1、2位数字表示:所在省份的代码</li>
   * <li>第3、4位数字表示:所在城市的代码</li>
   * <li>第5、6位数字表示:所在区县的代码</li>
   * <li>第7~14位数字表示:出生年、月、日</li>
   * <li>第15、16位数字表示:所在地的派出所的代码</li>
   * <li>第17位数字表示性别:奇数表示男性,偶数表示女性</li>
   * <li>第18位数字是校检码,用来检验身份证的正确性。校检码可以是0~9的数字,有时也用x表示</li>
   * 第十八位数字(校验码)的计算方法为:
   * <li>将前面的身份证号码17位数分别乘以不同的系数。从第一位到第十七位的系数分别为:7 9 10 5 8 4 2 1 6 3 7 9 10 5 8 4 2</li>
   * <li>将这17位数字和系数相乘的结果相加</li>
   * <li>用加出来和除以11,看余数是多少</li>
   * <li>余数只可能有0 1 2 3 4 5 6 7 8 9 10这11个数字。其分别对应的最后一位身份证的号码为1 0 X 9 8 7 6 5 4 3 2</li>
   * <li>通过上面得知如果余数是2,就会在身份证的第18位数字上出现罗马数字的Ⅹ。如果余数是10,身份证的最后一位号码就是2</li>
   * @param idcard 待验证的身份证
   * @return 是否有效的18位身份证,忽略x的大小写
   */
    console.error(IdCardUtil.isValidCard18("781111199407190143").getMsg())
    //输出  省份代码不正确:78
    console.error(IdCardUtil.convert15To18("420106640901234").getDataRow());
    //输出 420106194201062348
    console.error(IdCardUtil.isValidCard15("420106640901234").getMsg());
    //输出 身份证格式正确
    let province = IdCardUtil.getProvinceCodeByIdCard("142303111111111111");
    console.info(province.getSuccess() + "--" + province.getDataRow() + "--" + province.getMsg())
    //输出 true--140000--山西省
    let city = IdCardUtil.getCityCodeByIdCard("142303111111111111");
    console.info(city.getSuccess() + "--" + city.getDataRow() + "--" + city.getMsg())
    //输出 true--142300--吕梁地区
    let district = IdCardUtil.getDistrictCodeByIdCard("142303111111111111");
    console.info(district.getSuccess() + "--" + district.getDataRow() + "--" + district.getMsg())
    //输出 true--142303--汾阳市
    console.error(DateUtil.parse("2023-01-01"))
    //输出  Sun Jan 01 2023 08:00:00 GMT+0800
    console.error(DateUtil.formatDate("2023/1/1"))
    //输出  2023-01-01
    console.error(DateUtil.formatDate("2023/1/1",'yyyy-MM-dd HH:mm:ss'))
    //输出  2023-01-01 00:00:00
    console.error(DateUtil.format(new Date,'yyyy-MM-dd HH:mm:ss'))
    // 输出 2024-01-03 20:25:58
    console.error(DateUtil.format(new Date,'HH:mm:ss'))
    // 输出 20:27:06
    const difference = DateUtil.dateDiff(new Date('2023-01-01'), new Date('2023-01-10'));
    console.log(difference + ""); //输出 9
    const diff = DateUtil.strDateDiff('2023-11-01 12:12:12', '2024-01-10 12:12:12');
    console.log(diff + ""); //输出 70
    let res: OutDTO = RegUtil.isMatch(RegexConst.EMAIL, '111111');
    console.error(res.getSuccess() + "---" + res.getMsg());
    //输出 false---验证字符串格式不正确,请检查
    let res: OutDTO = RegUtil.isEmailMatch('13191191111@163.com');
    console.error(res.getSuccess() + "---" + res.getMsg());
    //输出  true---邮箱格式正确
    let res: OutDTO = RegUtil.isMobileMatch('21212');
    console.error(res.getSuccess() + "---" + res.getMsg());
    //输出  false---手机号码格式不正确,请检查
    let res: OutDTO = RegUtil.isIdCardMatch('21212');
    console.error(res.getSuccess() + "---" + res.getMsg());
    //输出  false---身份证号格式不正确,请检查
Logger.init('测试应用') 建议将该初始化方式写在EntryAbility.ets的onWindowStageCreate方法中
Logger.debug("debug错误原因为:", 'xxxxxxxxxxxx')
Logger.info("info错误原因为:", 'xxxxxxxxxxxx')
Logger.warn("warn错误原因为:", 'xxxxxxxxxxxx')
Logger.error("error错误原因为:", 'xxxxxxxxxxxx')
    console.error(ObjectUtil.equal("1", "1") + "")
    //输出 true
    console.error(ObjectUtil.notEqual("1", "1") + "")
    //输出 false
    //单次校验一个权限,入参为需要校验的权限
    let result = await AuthUtil.checkPermissions('ohos.permission.APPROXIMATELY_LOCATION');
    if (!result) {
     //此处可调用拉起授权方法
     ToastUtil.showToast('用户未授权~');
    } else {
      ToastUtil.showToast('用户已授权~');
    }
     //拉起用户单个权限授权操作,第一个参数为需要授予的权限,第二个参数为用户授权回调
     AuthUtil.reqPermissionsFromUser('ohos.permission.APPROXIMATELY_LOCATION', (index: number) => {
        //用户同意授权index为1,用户拒绝授权index为-1,根据结果进行业务操作
        ToastUtil.showToast(index == 1 ? '授权成功' : '用户取消授权~');
     })
     //拉起用户单个权限授权操作,用户同意授权code为1,用户拒绝授权code为-1,根据结果进行业务操作
     let code = await AuthUtil.reqPermissions('ohos.permission.APPROXIMATELY_LOCATION');
     if (code<0) {
       //授权失败
       return OutDTO.ErrorByDataRow<string>('获取当前位置失败~', '用户拒绝授权精准定位,获取定位失败~');
     }
     //拉起组合用户授权操作,入参为需要授权的权限集合
     let code = await AuthUtil.reqPermissionsList(['ohos.permission.APPROXIMATELY_LOCATION', 'ohos.permission.LOCATION']);
     //code为true表示权限集合均被授权,为false表示有权限未被授权
     if (!code) {
       //授权失败
       return OutDTO.ErrorByDataRow<string>('获取当前位置失败~', '用户拒绝授权精准定位,获取定位失败~');
     }
    console.error(PhoneUtil.isMobile("17111114114").getMsg())
    // 输出 手机号为中国号码
    console.error(PhoneUtil.isMobileHk("111111").getMsg())
    // 输出 手机号非中国香港号码,请检查
    console.error(PhoneUtil.isMobileTw("17111114114").getMsg())
    // 输出 手机号非中国台湾号码,请检查
    console.error(PhoneUtil.isMobileMo("17111114114").getMsg())
    // 输出 手机号非中国澳门号码,请检查
    console.error(PhoneUtil.isTel("17111114114").getMsg())
    // 输出 号码非中国座机,请检查
    console.error(PhoneUtil.isTel400800("17111114114").getMsg())
    // 输出 号码非400800格式的座机,请检查
    console.error(PhoneUtil.isPhone("17111114114").getMsg())
    // 输出 手机号为中国号码
    console.error(CharUtil.isEmoji(38)+"")
    // 输出 true
    console.error(CharUtil.isAscii("你")+"")
    // 输出 false
    console.error(StrUtil.isBlank(' ')+"")
    //输出  true
    const obj:Record<string,string> = {'key': 'this is value'} // key的值类型为 string | undefined
    const test = StrUtil.asString(obj)
const a = StrUtil.isBlankIfStr(obj);
const a = StrUtil.isEmptyIfStr(obj);
    console.error(StrUtil.isNotBlank('222')+"")
    //输出  true
    console.error(StrUtil.trim([" 你好 "," hi","hello "]).join("----"))
    //输出 你好----hi----hello
    console.error(StrUtil.hasBlank("","232323")+"")
    //输出  true
    console.error(StrUtil.isEmpty(' ')+"")
    //输出  false
    console.error(StrUtil.camelCase("Foo Bar"))  //输出 fooBar
    console.error(StrUtil.camelCase("--foo-bar--"))  //输出 fooBar
    console.error(StrUtil.camelCase("__FOO_BAR__"))  //输出 fooBar
console.error(StrUtil.capitalize("FooBar")) //输出 Foobar
console.error(StrUtil.endsWith('abc', 'b', 2) + "") //输出 true
console.error(StrUtil.repeat("*", 5)) //输出 *****
    const str = 'Hello, World';
    console.log(StrUtil.replace(str, 'Hello', 'Hi')); // 输出:'Hi, World'
    console.log(StrUtil.replace(str, /world/i, 'Universe')); // 输出:'Hello, Universe'
    console.log(StrUtil.replace(str, /[aeiou]/ig, 'X')); // 输出:'HXllX, WXXld'
    const str = 'Hello, World';
    console.log(StrUtil.startsWith(str, 'Hello') + ""); // 输出:true
    console.log(StrUtil.startsWith(str, 'World') + ""); // 输出:false
    console.log(StrUtil.startsWith(str, 'Hello', 7) + ""); // 输出:false
    console.log(StrUtil.startsWith(str, 'World', 7) + ""); // 输出:true
console.error(StrUtil.toLower('--Foo-Bar--')); //--foo-bar--
console.error(StrUtil.toUpper('--Foo-Bar--')); //--FOO-BAR--
    const str = 'Hello, World';
    console.log(StrUtil.truncate(str)); // 输出:'Hello, World'
    console.log(StrUtil.truncate(str, { length: 5 })); // 输出:'Hello...'
    console.log(StrUtil.truncate(str, { length: 10, omission: '***' })); // 输出:'Hello, Wo***'
    console.log(StrUtil.truncate(str, { separator: ',' })); // 输出:'Hello, World'

    const longStr = 'This is a very long string that needs to be truncated';
    console.log(StrUtil.truncate(longStr, { length: 10 })); // 输出:'This is a ....'
    console.log(StrUtil.truncate(longStr, { length: 10, separator: ' ' })); // 输出:'This is a very...'
RandomUtil.randomStrBySize(16);
RandomUtil.randomUnitBySize(16);
let iv = await RandomUtil.generateIV();
    console.error(RandomUtil.randomBoolean()+"")
    //输出  true/false
    console.error(RandomUtil.randomChinese())
    //输出  趐
    console.error(RandomUtil.randomNumber(1000,10000)+"")
    //输出  3184
    console.error(RandomUtil.randomInt()+"")
    //输出  842905298955385
    console.error(RandomUtil.randomLimit(100)+"")
    //输出  54
    let n = ArrayUtil.append(["1", "2", "3"], ["4"]);
    n.forEach(item => {
      console.error(item);
    })
    //输出  1 2 3 4
    let arr = ArrayUtil.setOrAppend<string>(["1212", "3232", "5345", "645654", "64564564x"], 2, "你好");
    console.error(JSON.stringify(arr))
    //输出  ["1212","3232","你好","645654","64564564x"]
    let arr2 = ArrayUtil.replace<string>(["1212", "3232", "5345", "645654", "64564564x"], 1, "halo");
    console.error(JSON.stringify(arr2))
    //输出  ["1212","halo","5345","645654","64564564x"]
    let pArr: Array<Person> = JSONUtil.parseArray('[{"name":"测试名称1","age":18,"birth":"2023-01-01"},{"name":"测试名称3","age":3,"birth":"2021-11-01 12:12:12" },{"name":"测试名称4","age":34,"birth":"2023-01-01 12:12:12" },{"name":"测试名称2","age":23,"birth":"2021-01-01 12:12:12" }]', DateConst.YMD_HLINE_HMS);
    let flter = ArrayUtil.filter<Person>(pArr, (item: Person) => item.name.includes("4"));
    console.error(JSON.stringify(flter))
    //输出  [{"name":"测试名称4","age":34,"birth":"2023-01-01 12:12:12"}]
    ArrayUtil.reverse<Person>(pArr);
    console.log(JSONUtil.toJSONString(pArr));
    //输出  [{"name":"测试名称4","age":23,"birth":"2021-01-01 12:12:12"},{"name":"测试名称3","age":34,"birth":"2023-01-01 12:12:12"},{"name":"测试名称2","age":3,"birth":"2021-11-01 12:12:12"},{"name":"测试名称1","age":18,"birth":"2023-01-01 00:00:00"}]
    console.error(ArrayUtil.min<number>([345, 5, 67, 899076, 3, 2, 143, 17, 65]) + "")
    //输出  2
    console.error(ArrayUtil.max<number>([345, 5, 67, 899076, 3, 2, 143, 17, 65]) + "")
    //输出  899076
    let nArr = ArrayUtil.distinct<string, string>(["你", "helo", "哇哈哈哈", "212121", "2222", "哇哈哈哈", "你"], item => item);
    console.error(JSONUtil.toJSONString(nArr));
    //输出  ["你","helo","哇哈哈哈","212121","2222"]
    const array = [1, 2, 3, 4, 5];
    const removed = ArrayUtil.remove(array, (value: number) => value % 2 === 0);
    console.log(JSONUtil.toJSONString(removed)); // [4,2]
    console.log(JSONUtil.toJSONString(array)); // [1, 3, 5]
    console.error(JSONUtil.toJSONString(ArrayUtil.removeEmptyValues([1, "", "ssss", "", true])))
    //输出  [1,"ssss",true]
    const arr1 = [1, 2, 3];
    const arr2 = [2, 3, 4];
    const arr3 = [3, 4, 5];
    const result = ArrayUtil.union(arr1, arr2, arr3);
    console.log(JSONUtil.toJSONString(result)); // 输出:[1, 2, 3, 4, 5]
    let str: string[] = [];
    ArrayUtil.defaultIfEmpty(str, ["1", "32"]).forEach(item => {
      this.message += item + "、";
    })
    //输出 1、32
    let str: string[] = [];
    if (ArrayUtil.isNotEmpty(str)) {
      this.message = "不是空的";
    } else {
      this.message = "是空的"
    }
    //输出 是空的
    let str: string[] = [];
    if (ArrayUtil.isEmpty(str)) {
      this.message = "是空的";
    } else {
      this.message = "不是空的"
    }
    //输出 是空的
    let str: string[] = ["", ""];
    if (ArrayUtil.strValIsEmpty(str)) {
      this.message = "是空的";
    } else {
      this.message = "不是空的"
    }
    let str: string[] = ["1",""];
    if (ArrayUtil.strValIsNotEmpty(str)) {
      this.message = "不是空的";
    } else {
      this.message = "是空的"
    }
    //输出  不是空的
    //存入字符串<>中数据类型为必填
    CacheUtil.save<string>("str", "测试存入字符串");
    //存入对象T<>中数据类型为必填
    let person = new Person('测试', 12, new Date(), new User("uuid", "打撒吃的是草动次打次"));
    CacheUtil.save<Person>("tetObj", person);
    //存入对象集合<>中数据类型为必填
    let arrP = Array<Person>();
    arrP[0] = new Person('test1', 1, new Date(), new User("uuid1", "user测试内容1"));
    arrP[1] = new Person('test2', 2, new Date(), new User("uuid2", "user测试内容2"));
    arrP[2] = new Person('test3', 3, new Date(), new User("uuid3", "user测试内容3"));
    CacheUtil.save<Array<Person>>("arrPerson", arrP);
    //获取字符串<>中数据类型为必填
    this.message = CacheUtil.get<string>("str");
    //获取对象T<>中数据类型为必填
    let p = CacheUtil.get<Person>("tetObj");
    this.message = p.name + p.age + p.user.id;
    //获取对象集合<>中数据类型为必填
    let newStr: string = '';
    let res = CacheUtil.get<Array<Person>>("arrPerson");
    res.forEach(item => {
      newStr += item.age + item.name + item.user.id + item.user.name;
    })
    this.message = newStr;
    console.error(IdUtil.simpleUUID())
    //输出   076bb3b9db6f4ecb885dbdbdd2c29080
    console.error(IdUtil.fastUUID())
    //输出  628128FC-55CA-48B7-8EA0-5162848FDCEF
    console.error(IdUtil.fastSimpleUUID())
    //输出  56703FA1-0BB-503-D93-00E94A28422
    console.error(IdUtil.randomUUID())
    //输出  600cddfb-1e88-4798-8987-bfb703be76ff
  //成功失败标识
  private success: boolean;
  //返回提示信息
  private msg: string;
  //返回单行数据
  private dataRow?: T;
  //返回数据集合
  private dataTable?: Array<T>;
    let res:OutDTO = OutDTO.OK("只返回提示消息~");
    console.error(res.getMsg()+"------"+res.getSuccess())
    //输出只返回提示消息~------true
    let p: Person = JSONUtil.parseObject<Person>('{"name":"测试名称","age":18,"birth":"2024-01-03" }', 'yyyy/MM/dd HH:mm:ss')
    let res: OutDTO<Person> = OutDTO.OKByDataRow<Person>('成功过了~', p);
    console.error(res.getMsg() + "------" + res.getSuccess()+"-----"+res.getDataRow())
    //输出   成功过了~------true-----[object Object]
    let pArr: Array<Person> = JSONUtil.parseArray('[{"name":"测试名称1","age":18,"birth":"2023-01-01"},{"name":"测试名称2","age":23,"birth":"2021-01-01 12:12:12" }]', DateConst.YMD_HLINE_HMS);
    let res = OutDTO.OKByDataTable<Person>('成功过了11111~', pArr);
    console.error(res.getMsg() + "------" + res.getSuccess()+"-----"+res.getDataTable().length)
    //输出  成功过了11111~------true-----2
    let res:OutDTO = OutDTO.Error("只返回失败提示消息~");
    console.error(res.getMsg()+"------"+res.getSuccess())
    //输出 只返回失败提示消息~------false
    let p: Person = JSONUtil.parseObject<Person>('{"name":"测试名称","age":18,"birth":"2024-01-03" }', 'yyyy/MM/dd HH:mm:ss')
    let res: OutDTO = OutDTO.ErrorByDataRow<Person>("只返回失败提示消息~", p);
    console.error(res.getMsg() + "------" + res.getSuccess()+res.getDataRow())
    //输出  只返回失败提示消息~------false[object Object]
getSuccess 获取成功失败标识
setSuccess 设置成功失败标识
getMsg 获取提示消息
setMsg 设置提示消息
getDataRow 获取单行数据
setDataRow 设置单行数据
getDataTable 获取多行数据
setDataTable 设置多行数据
    const rsa = await RSA.generateRSAKey();
    console.error("generateRSAKey:" + rsa.getSuccess() + "---" + rsa.getMsg()
    + "\n" + "公钥:" + rsa.getDataRow().publicKey + "私钥:" + rsa.getDataRow().privateKey)
    const rsa = await RSA.generate2048RSAKey();
    console.error("generateRSAKey:" + rsa.getSuccess() + "---" + rsa.getMsg()
    + "\n" + "公钥:" + rsa.getDataRow().publicKey + "私钥:" + rsa.getDataRow().privateKey)
    let encode = await RSA.encodePKCS1('测试RSA-PKCS1加密字符串CSX~~', rsa.getDataRow().publicKey);
    this.message = encode.getDataRow();
    let encode = await RSA.encodePKCS1Segment('测试RSA-PKCS1分段加密字符串CSX~~', rsa.getDataRow().publicKey);
    this.message = encode.getDataRow();
    let encode = await RSA.encode2048PKCS1('测试RSA-PKCS12048位加密字符串CSX~~', rsa.getDataRow().publicKey);
    this.message = encode.getDataRow();
    let encode = await RSA.encode2048PKCS1Segment('测试RSA-PKCS12048位分段加密字符串CSX~~', rsa.getDataRow().publicKey);
    this.message = encode.getDataRow();
    let decode = await RSA.decodePKCS1(encode.getDataRow(), rsa.getDataRow().privateKey);
    this.message = decode.getDataRow();
    let decode = await RSA.decodePKCS1Segment(encode.getDataRow(), rsa.getDataRow().privateKey);
    this.message = decode.getDataRow();
    let decode = await RSA.decode2048PKCS1(encode.getDataRow(), rsa.getDataRow().privateKey);
    this.message = decode.getDataRow();
    let decode = await RSA.decode2048PKCS1Segment(encode.getDataRow(), rsa.getDataRow().privateKey);
    this.message = decode.getDataRow();
    let sign = await RSA.signPKCS1('这个是RSA的验签字符串~~', rsa.getDataRow().privateKey);
    this.message = sign.getDataRow();
    let sign = await RSA.sign2048PKCS1('这个是RSA的2048位验签字符串~~', rsa.getDataRow().privateKey);
    this.message = sign.getDataRow();
    let verify = await RSA.verifyPKCS1(sign.getDataRow(), '这个是RSA的验签字符串~~', rsa.getDataRow().publicKey);
    this.message = verify.getMsg();
    let verify = await RSA.verify2048PKCS1(sign.getDataRow(), '这个是RSA的2048位验签字符串~~', rsa.getDataRow().publicKey);
    this.message = verify.getMsg();
    //1024位示例
    //pem中数据支持没有回车符、换行符也支持每行以'\r\n'符结束
    let pubKey = RSA.pemToStrKey(`-----BEGIN PUBLIC KEY-----
                  MIGfMA0GCSqGSIb3DQEBAQUAA4GNADCBiQKBgQDhoZDHUVp7y2zw7T7SQYDiUQCn
                  ImnsKogqWOF3hBfaBr8xK/7I/PfbLcPV/MrWKPi2uaiXkhmITX+24ZWVBInxELBa
                  4kccFJeZReMRmu7rKZgkVzU6JKyfaH8zMxipEBh0TyS6JVHHjPd4eezzzVDHc59O
                  fYyzs3kM3Z6oczwTDwIDAQAB
                  -----END PUBLIC KEY-----`);
    let encode = await RSA.encodePKCS1('测试RSA-PKCS1加密字符串CSX~~', pubKey);
    this.message = encode.getDataRow();
    let priKey = RSA.pemToStrKey(`-----BEGIN PRIVATE KEY-----
                MIICeAIBADANBgkqhkiG9w0BAQEFAASCAmIwggJeAgEAAoGBAOGhkMdRWnvLbPDt
                PtJBgOJRAKciaewqiCpY4XeEF9oGvzEr/sj899stw9X8ytYo+La5qJeSGYhNf7bh
                lZUEifEQsFriRxwUl5lF4xGa7uspmCRXNTokrJ9ofzMzGKkQGHRPJLolUceM93h5
                7PPNUMdzn059jLOzeQzdnqhzPBMPAgMBAAECgYEAjJjm5Kz3G0kJ25+ak94pd91N
                8Nfq9TUToH++D4GKc1vc68EkhQ3NTRDZhZB+vLDPOt26BqkNq/fO66DqWu93HEra
                jBE4pZzCxmVmLanuimxiA45Td1DalL0mmd9ab2cusqwXo6LDs3mSU/t7gSBRUCnt
                kv4MBZMgIDA92QSadHECQQD1HZKBIbWQtZ4nDxgaP1MOQC7dKmXlIkCsDbuwaZhj
                RM8/+iqBBtgSkviwOCDWNiFcpzf+nUM1+ba9OE9iTOqTAkEA66Z/ifnKVCNbHiW8
                i6E2K/2NcJH4qsxRrIMs+eyxqC/yEjkxol26OVmemxu22Fjkx/xIOKg6zFJRstXy
                i6P3FQJBAKZ7xINCwxCb2uSKowNI2X/HZk0/u9+qqSRzW3TR8/gQx3eb0fy7Ck1r
                V9BQ/zSfpX9J8IVWiU0C4/SXZ4vL1FMCQQCPaQh9I7NqeQne0wBnyXh6VRhaxbsb
                1rRt1Hbusol73ZHoXT5Dnd7TQCMyKi+ggpjYzEP3lwoRhpeJyoKNUP/xAkB+//w9
                SyKHWOZOCLj47/1/7YZGzKv/Ttb4NVFtqDPl2QtbXqDcP8d5ZI4p37rJIq1XZ0sT
                l2UgKQV+KZkPdL1n
                -----END PRIVATE KEY-----
                `)
    let decode = await RSA.decodePKCS1(encode.getDataRow(), priKey);
    this.message = decode.getDataRow();
    //2048位示例
    //pem中数据支持没有回车符、换行符也支持每行以'\r\n'符结束
    let pubKey = RSA.pemToStrKey(`-----BEGIN PUBLIC KEY-----
                MIIBIjANBgkqhkiG9w0BAQEFAAOCAQ8AMIIBCgKCAQEA1nwHtqSbMNwjHKutrLUI
                +dMBCtoRb/SSY00ujBMsNPFdERxaizxgWVZbypVqgj3/4ZsZw9R65OyQu6oLqjA9
                Wk2nVLpPRtZNjwJgNRB4pYKf+RmLn35UdpIQC9/1+UUeoelboLEMCamCeXPCT5dv
                xqVheO+S6IOLiN6XGbkNZM2VBNtmAhIUVDLct2yH5YbD6plC8Tg+iMbiigG7r7Cs
                JE+Go5tb3BZjUYiF8fJ5ZKYCATkK4lO39rsXU8AAnw0duAq7LHk6xacwjyUA57S8
                0S3LFHcOyP7UoNfQ+cbV/z+72sYJV4RwO6AeE2Muz8jYR1GlcCW1wYBGNOpyRVKg
                4QIDAQAB
                -----END PUBLIC KEY-----`);
    let encode = await RSA.encode2048PKCS1('测试2048位RSA-PKCS1加密字符串CSX~~', pubKey);
    this.message = encode.getDataRow();
    //2048位pem私钥
    let priKey = RSA.pemToStrKey(`-----BEGIN RSA PRIVATE KEY-----
                MIIEpAIBAAKCAQEA1nwHtqSbMNwjHKutrLUI+dMBCtoRb/SSY00ujBMsNPFdERxa
                izxgWVZbypVqgj3/4ZsZw9R65OyQu6oLqjA9Wk2nVLpPRtZNjwJgNRB4pYKf+RmL
                n35UdpIQC9/1+UUeoelboLEMCamCeXPCT5dvxqVheO+S6IOLiN6XGbkNZM2VBNtm
                AhIUVDLct2yH5YbD6plC8Tg+iMbiigG7r7CsJE+Go5tb3BZjUYiF8fJ5ZKYCATkK
                4lO39rsXU8AAnw0duAq7LHk6xacwjyUA57S80S3LFHcOyP7UoNfQ+cbV/z+72sYJ
                V4RwO6AeE2Muz8jYR1GlcCW1wYBGNOpyRVKg4QIDAQABAoIBAB2ckhQNNb/RJKfY
                q+mkNNEI6KPu52llgrBi/4InQ3srt4WdPILsmwC6g4G8jy/cD2++UhhPRYhFgNXn
                7CRa9J17CxcPgdJt09dipJWu6HkxR5TEihpC/rZABCcfjH4VpN0FsrjEuLy8wl6y
                NKl4Zt4uBv8DVGz1fFYxJPtQKSE5YBSbvMD1thhViKOSyYp/pQfu00oz7/XK6iDE
                oHAhcdTBcBl9YW2WaXCnuX02FQkO5h8kjJbQd6pW4EfLLUxKjwcxcJ61DswcAaPw
                PN4+bgiwMak8H3IFrZVP24qs4ZOT3Yh7dl75OZXw7XcuBxsR/eCDlIe5VSSS+MId
                JCc42uECgYEA8jbvO07ESaVYvdij21knF+5Tdjg5rG2q0qsocWlxsE+8IkjzRAgF
                oovXqwoyDkhFJ/1N/PEnBqiQngbUhRSst49ICCQVv+fzRX2WjUNg4k2FtLO0jwgL
                Z+E6grMkMkv7VDIxyWlY5rYUC1yw6USFjgyMGQaWps8o4+JLsGJd9PsCgYEA4rER
                ecoYZndLRGmqMtmGZATDyNh6jGXzGF4XgHahnbhqgw3+7aTDXpA9W1TdGeBI4cQ9
                HQMjroJ+X/yx2JWysimnFxMXuU4eXZo3vMuebXB3lRe2QcloO1HobeSdUCosJ3qa
                Ks+f3UtN9Q8ZiPb5P0tA/fIbe6cwwQTQ1FLbQtMCgYEA0DpD3lOv0bRRHxygeVEi
                l6Muo0Jg6oh5Q5UbNqy0rSNPFJZsc/8FgSEBrqwcLkUZFvDf2+UhbMr7UK+Egkgs
                171Y6o7DF/D7JbF6/USAhOyqVpfrUM9UpuBs4bHKG2dQ0Kg6PvHPGMBNaRsth8x9
                mInW4yjT2OHdQFPqR9+48IMCgYBJXXkEa21+K/mGCJR2pIOj9w7N/5GZwpzsM/dz
                MfGYM8j05SCuFHbOMexJlKuB5l5wAqysqQlxPvZbZlLAf6I3mtdi1mEFLc0SCgkj
                5to9HPr2m5f2rpI3MIkCl8x510w28qzWUh+w5OA0AVEITLXZ0CcWiLZwTGmw7jgP
                n0kq1QKBgQDWDHZaEGCAYPxytix3tTCG3EIly8+fQJGt1lc0vgiiFcS0cW2pBbko
                rVvbu1gSJnmvj0dIObp55wwFBs30xEiMfli+83srOur6nxYUDgn9rqGcufn6hOeH
                ++y1uOHhOenfUTy51Gy1Dlv+maJ3LZ0ZnqPnbBdhZ1RtXFnczVKeFg==
                -----END RSA PRIVATE KEY-----`)
    let decode = await RSA.decode2048PKCS1(encode.getDataRow(), priKey);
    const aes = await  AES.generateAESKey();
    console.error("是否成功:" + aes.getSuccess() + "消息===:" + aes.getMsg() + "密钥======:", aes.getDataRow());
    const aes = await  AES.generateAESKey128();
    console.error("是否成功:" + aes.getSuccess() + "消息===:" + aes.getMsg() + "密钥======:", aes.getDataRow());
    let encodeGCM = await AES.encodeGCM('测试加密字符串Test!', aes.getDataRow());
    this.message = encodeGCM.getDataRow();
    let decodeGCM = await AES.decodeGCM(encodeGCM.getDataRow(), aes.getDataRow());
    this.message = decodeGCM.getDataRow();
    let encode = await AES.encodeCBC('测试CBC加密字符串Test!', aes.getDataRow(), iv.getDataRow());
    this.message = encode.getDataRow();
    let decode = await AES.decodeCBC(encode.getDataRow(), aes.getDataRow(), iv.getDataRow());
    this.message = decode.getDataRow();
    let encode = await AES.encodeECB('此处为共享密钥加密的数据~~~~~~', aesKey);
    this.message = encode.getDataRow();
    let decode = await AES.decodeECB(encode.getDataRow(), aesKey);
    this.message = decode.getDataRow();
    let encode = await AES.encodeECB128('此处为共享密钥加密的数据~~~~~~', aesKey);
    this.message = encode.getDataRow();
    let decode = await AES.decodeECB128(encode.getDataRow(), aesKey);
    this.message = decode.getDataRow();
    let des = await DES.generate3DESKey();
    console.error("是否成功:" + des.getSuccess() + "消息===:" + des.getMsg() + "密钥======:", des.getDataRow());
    let encodeECB = await DES.encodeECB('测试3DES-ECB加密字符串Test!', des.getDataRow());
    this.message = encodeECB.getDataRow();
    let decodeECB = await DES.decodeECB(encodeECB.getDataRow(), des.getDataRow());
    this.message = decodeECB.getDataRow();
    let encodeCBC = await DES.encodeCBC('测试3DES-CBC加密字符串Test!', des.getDataRow(), iv.getDataRow());
    this.message = encodeCBC.getDataRow();
    let decodeCBC = await DES.decodeCBC(encodeCBC.getDataRow(), des.getDataRow(), iv.getDataRow());
    this.message = decodeCBC.getDataRow();
    let sm2 = await SM2.generateSM2Key();
    console.error("generateSM2Key:" + sm2.getSuccess() + "---" + sm2.getMsg()
    + "\n" + "公钥:" + sm2.getDataRow().publicKey + "私钥:" + sm2.getDataRow().privateKey)
    let encode = await SM2.encode('测试SM2加密字符串CSX~~', sm2.getDataRow().publicKey);
    this.message = encode.getDataRow();
    let decode = await SM2.decode(encode.getDataRow(), sm2.getDataRow().privateKey);
    this.message = decode.getDataRow();
    let sign = await SM2.sign('这个是SM2的验签字符串~~', sm2.getDataRow().privateKey);
    this.message = sign.getDataRow();
    let verify = await SM2.verify(sign.getDataRow(), '这个是SM2的验签字符串~~', sm2.getDataRow().publicKey);
    this.message = verify.getMsg();
    //C1C3C2格式的公钥字符串
    let pk = '04ba3bc3c5834d9ad1a7d81c4b49cf1209d2f28e4a97c73b75d6561792a2bfafe811e0284692006b0ce1b51f8aadfd65241d80eb979365048253408f5d705ec17b';
    //转换后的ASN.1格式的字符串
    let s = await SM2.convertSM2PubKey(pk);
    let code = await SM2.encode('加密字符~~~~~', s.getDataRow());
    let ddd = code.getDataRow();
    //C1C3C2格式的私钥字符串
    let pik = '7713d336bcbbffb8b7f9cab8db984a5c989a0b07697f569a06d5cd38e1351d07';
    //转换后的ASN.1格式的字符串
    let dc = await SM2.convertSM2PriKey(pik);
    let aaaa = await SM2.decode(ddd, dc.getDataRow());
    this.message = aaaa.getDataRow();
    let sm3 = await SM3.digest('使用SM3进行摘要数据~~~');
    this.message = sm3.getDataRow();
    let hmac1 = await SM3.hmac('这个是SM3的HMAC~~~');
    this.message = hmac1.getDataRow();
    let sm4 = await SM4.generateSM4Key();
    console.error("是否成功:" + sm4.getSuccess() + "消息===:" + sm4.getMsg() + "密钥======:", sm4.getDataRow());
    let encodeECB = await SM4.encodeECB('测试SM4加密字符串Test!', sm4.getDataRow());
    this.message = encodeECB.getDataRow();
    let decodeECB = await SM4.decodeECB(encodeECB.getDataRow(), sm4.getDataRow());
    this.message = decodeECB.getDataRow();
    let encodeCBC = await SM4.encodeCBC('测试SM4的CBC加密字符串Test!', sm4.getDataRow(), iv.getDataRow());
    this.message = encodeCBC.getDataRow();
    let decodeCBC = await SM4.decodeCBC(encodeCBC.getDataRow(), sm4.getDataRow(), iv.getDataRow());
    this.message = decodeCBC.getDataRow();
    let digest = await SHA.digest('这个是SHA的摘要方法~~');
    this.message = digest.getDataRow();
    let digest = await SHA.digestSHA1('这个是SHA的摘要方法~~');
    this.message = digest.getDataRow();
    let digest = await SHA.digestSHA224('这个是SHA的摘要方法~~');
    this.message = digest.getDataRow();
    let digest = await SHA.digestSHA384('这个是SHA的摘要方法~~');
    this.message = digest.getDataRow();
    let digest = await SHA.digestSHA512('这个是SHA的摘要方法~~');
    this.message = digest.getDataRow();
    let hmac2 = await SHA.hmac('这个是SHA的HMAC');
    this.message = hmac2.getDataRow();
    let md5 = await MD5.digest('使用MD5进行摘要~~~');
    this.message = md5.getDataRow();
    let ecdsa = await ECDSA.generateECDSAKey();
    console.error("generateECDSAKey:" + ecdsa.getSuccess() + "---" + ecdsa.getMsg()
    + "\n" + "公钥:" + ecdsa.getDataRow().publicKey + "私钥:" + ecdsa.getDataRow().privateKey)
    let sign = await ECDSA.sign('这个是ECDSA的验签字符串~~', ecdsa.getDataRow().privateKey);
    this.message = sign.getDataRow();
    let verify = await ECDSA.verify(sign.getDataRow(), '这个是ECDSA的验签字符串~~', ecdsa.getDataRow().publicKey);
    this.message = verify.getMsg();
    //1.测试随机生成的一种256长度的字符串公私钥秘钥
    let ecdsa = await ECDSA.generateECDSAKey();
    //将对方的公钥和自己的私钥传入生成256位的共享秘钥
    let symKey = await ECDH.ecdh(ecdsa.getDataRow().publicKey, ecdsa.getDataRow().privateKey);
    //可以进行对称加密 注意对称加解密也需要为256位
    let encode = await CryptoUtil.encodeECB('测试共享密钥加密数据~~~', symKey.getDataRow(), 'AES256', 'AES256|ECB|PKCS7');
    this.message = encode.getDataRow();
    //对称解密
    let decode = await CryptoUtil.decodeECB(encode.getDataRow(), symKey.getDataRow(), 'AES256', 'AES256|ECB|PKCS7');
    this.message = decode.getDataRow();
    //2.测试随机生成的一种256长度的字节流Uint8Array形式的公私钥秘钥
    // 创建非对称密钥生成器
    let rsaGenerator = crypto.createAsyKeyGenerator('ECC256');
    // 通过非对称密钥生成器,随机生成非对称密钥
    let promiseKeyPair = await rsaGenerator.generateKeyPair();
    // 转换成可以读懂的公私钥字符串
    let pubKey = promiseKeyPair.pubKey.getEncoded().data;
    let priKey = promiseKeyPair.priKey.getEncoded().data;
    //获取到贡献密钥
    let symKey = await ECDH.ecdh(pubKey, priKey);
    //可以进行对称加密 注意对称加解密也需要为256位
    let encode = await CryptoUtil.encodeECB('测试共享密钥加密数据~~~', symKey.getDataRow(), 'AES256', 'AES256|ECB|PKCS7');
    this.message = encode.getDataRow();
    //对称解密
    let decode = await CryptoUtil.decodeECB(encode.getDataRow(), symKey.getDataRow(), 'AES256', 'AES256|ECB|PKCS7');
    this.message = decode.getDataRow();
    //1.测试随机生成的一种256长度的字符串公私钥秘钥
    let x25519Key = await CryptoUtil.generateCryptoKey('X25519');
    //将对方的公钥和自己的私钥传入生成256位的共享秘钥
    let x25519 = await X25519.x25519(x25519Key.getDataRow().publicKey, x25519Key.getDataRow().privateKey);
    this.message = x25519.getDataRow();
    //可以进行对称加密 注意对称加解密也需要为256位
    let encode = await CryptoUtil.encodeECB('测试共享密钥加密数据~~~', x25519.getDataRow(), 'AES256', 'AES256|ECB|PKCS7');
    this.message = encode.getDataRow();
    //对称解密
    let decode = await CryptoUtil.decodeECB(encode.getDataRow(), x25519.getDataRow(), 'AES256', 'AES256|ECB|PKCS7');
    this.message = decode.getDataRow();
    //2.测试随机生成的一种256长度的字节流Uint8Array形式的公私钥秘钥
    let rsaGenerator = crypto.createAsyKeyGenerator('X25519');
    // 通过非对称密钥生成器,随机生成非对称密钥
    let promiseKeyPair = await rsaGenerator.generateKeyPair();
    // 转换成可以读懂的公私钥字符串
    let pubKey = promiseKeyPair.pubKey.getEncoded().data;
    let priKey = promiseKeyPair.priKey.getEncoded().data;
    let x25519 = await X25519.x25519(pubKey, priKey);
    //可以进行对称加密 注意对称加解密也需要为256位
    let encode = await CryptoUtil.encodeECB('测试共享密钥加密数据~~~', x25519.getDataRow(), 'AES256', 'AES256|ECB|PKCS7');
    this.message = encode.getDataRow();
    //对称解密
    let decode = await CryptoUtil.decodeECB(encode.getDataRow(), x25519.getDataRow(), 'AES256', 'AES256|ECB|PKCS7');
    this.message = decode.getDataRow();
    let userList = new Array<User>();
    userList.push(new User('2345', '测试用户1'));
    userList.push(new User('7844', '测试用户2'));
    let person = new Person('测试', 12, true, new Date(), new User("uuid", "打撒吃的是草动次打次"), userList);
    let j = JSONObject.toJSONString(person);
    let f = JSONObject.parse(j);
    let userList = new Array<User>();
    userList.push(new User('2345', '测试用户1'));
    userList.push(new User('7844', '测试用户2'));
    let person = new Person('测试', 12, true, new Date(), new User("uuid", "打撒吃的是草动次打次"), userList);
    let j = JSONObject.toJSONString(person);
    let o = JSONObject.parseObject<Person>(j);
    let userList = new Array<User>();
    userList.push(new User('2345', '测试用户1'));
    userList.push(new User('7844', '测试用户2'));
    let person = new Person('测试', 12, true, new Date(), new User("uuid", "打撒吃的是草动次打次"), userList);
    let j = JSONObject.toJSONString(person);
    let userList = new Array<User>();
    userList.push(new User('2345', '测试用户1'));
    userList.push(new User('7844', '测试用户2'));
    let person = new Person('测试', 12, true, new Date(), new User("uuid", "打撒吃的是草动次打次"), userList);
    let j = JSONObject.from<Person>(person);
    let jsonObj = new JSONObject();
    jsonObj.set("id", "100010");
    jsonObj.set("age", 27);
    jsonObj.set("sex", true);
    jsonObj.set("birth", new Date());
    let user = new JSONObject();
    user.set("uid", "121212");
    user.set("uName", "测试\\\"套对象");
    jsonObj.set("user", user);
    jsonObj.set("test", null);
    jsonObj.set("person", new User('实体id', '实体name'));
    jsonObj.set("name", "test字符串");
    let st = jsonObj.toString();
    let userList = new Array<User>();
    userList.push(new User('2345', '测试用户1'));
    userList.push(new User('7844', '测试用户2'));
    userList.push(new User('1314', '测试用户3'));
    userList.push(new User('5210', '测试用户4'));
    let s = JSONArray.toJSONString(userList);
    let jsArr = JSONArray.parse(s);
    let userList = new Array<User>();
    userList.push(new User('2345', '测试用户1'));
    userList.push(new User('7844', '测试用户2'));
    userList.push(new User('1314', '测试用户3'));
    userList.push(new User('5210', '测试用户4'));
    let s = JSONArray.toJSONString(userList);
    let userList = new Array<User>();
    userList.push(new User('2345', '测试用户1'));
    userList.push(new User('7844', '测试用户2'));
    userList.push(new User('1314', '测试用户3'));
    userList.push(new User('5210', '测试用户4'));
    let jarr = JSONArray.from(userList);
    let arr = new JSONArray();
    arr.push(1);
    arr.push("cccc");
    arr.push("123");
    arr.push("aaaaa\\\"34343434");
    arr.push("2223\"dasdass");
    arr.push(new Date());
    arr.push(true);
    arr.push(null);
    arr.push(new User("10010", "实体数据"));
    let str = arr.toString();
    class TestDDD {
      threeMonthRate?: string;
      moduleName?: string;
      productName?: string;
      marketPatter?: string;
      labelListJson?: site;
    }
    class site {
      site1?: site1;
    }
    class site1 {
      labelType?: string;
      labelValue?: string;
      labelName?: string;
      labelLocation?: string;
    }
    let str1 = '[{"threeMonthRate":null,"moduleName":"loan","productName":"网E贷","marketPatter":"随借随还,最高20万,利率低至8折起","labelListJson":{"site1":{"labelType":0,"labelValue":"网E贷","labelName":"产品名称:123","labelLocation":true}}},{"threeMonthRate":null,"moduleName":"loan","productName":"烟草贷","marketPatter":"无需抵押,无需担保,当天放款,随借随还","labelListJson":{"site1":{"labelType":12,"labelValue":"烟草贷","labelName":"产品名称","labelLocation":false}}}]';
    let array = JSONArray.parseArray<TestDDD>(str1);
    array.forEach(item => {
      this.msg += item.labelListJson?.site1?.labelName + " ";
    })
    let userList = new ArrayList<User>();
    userList.add(new User('2345', '测试用户1'));
    userList.add(new User('7844', '测试用户2'));
    userList.add(new User('1314', '测试用户3'));
    userList.add(new User('5210', '测试用户4'));
    let s = JSONArrayList.toJSONString(userList);
    let jsArr = JSONArrayList.parse(s);
    let userList = new ArrayList<User>();
    userList.add(new User('2345', '测试用户1'));
    userList.add(new User('7844', '测试用户2'));
    userList.add(new User('1314', '测试用户3'));
    userList.add(new User('5210', '测试用户4'));
    let s = JSONArrayList.toJSONString(userList);
    let userList = new ArrayList<User>();
    userList.add(new User('2345', '测试用户1'));
    userList.add(new User('7844', '测试用户2'));
    userList.add(new User('1314', '测试用户3'));
    userList.add(new User('5210', '测试用户4'));
    let jarr = JSONArrayList.from(userList);
    let arr = new JSONArrayList();
    arr.add(1);
    arr.add("cccc");
    arr.add("123");
    arr.add("aaaaa\\\"34343434");
    arr.add("2223\"dasdass");
    arr.add(new Date());
    arr.add(true);
    arr.add(null);
    arr.add(new User("10010", "实体数据"));
    let str = arr.toString();
    class TestDDD {
      threeMonthRate?: string;
      moduleName?: string;
      productName?: string;
      marketPatter?: string;
      labelListJson?: site;
    }
    class site {
      site1?: site1;
    }
    class site1 {
      labelType?: string;
      labelValue?: string;
      labelName?: string;
      labelLocation?: string;
    }
    let str1 = '[{"threeMonthRate":null,"moduleName":"loan","productName":"网E贷","marketPatter":"随借随还,最高20万,利率低至8折起","labelListJson":{"site1":{"labelType":0,"labelValue":"网E贷","labelName":"产品名称:123","labelLocation":true}}},{"threeMonthRate":null,"moduleName":"loan","productName":"烟草贷","marketPatter":"无需抵押,无需担保,当天放款,随借随还","labelListJson":{"site1":{"labelType":12,"labelValue":"烟草贷","labelName":"产品名称","labelLocation":false}}}]';
    let array = JSONArrayList.parseArrayList<TestDDD>(str1);
    array.forEach(item => {
      this.msg += item.labelListJson?.site1?.labelName + " ";
    })
    let userList = new Array<User>();
    userList.push(new User('2345', '测试用户1'));
    userList.push(new User('7844', '测试用户2'));
    let person = new Person('测试', 12, true, new Date(), new User("uuid", "打撒吃的是草动次打次"), userList);
    //第二个参数为如果数据有日期类型时是否传入转换格式,不传默认为yyyy-MM-dd
    let str1 = JSONUtil.toJSONString(person,DateConst.YMD_HLINE_HMS);
    let person = new Person('测试', 12, new Date(), new User("101291021", "打撒吃的是草动次打次"));
    let str = JSONUtil.toJSONString(person);
    console.log(str)
    JSONUtil.parse(str);
    let userList = new Array<User>();
    userList.push(new User('2345', '测试用户1'));
    userList.push(new User('7844', '测试用户2'));
    let person = new Person('测试', 12, true, new Date(), new User("uuid", "打撒吃的是草动次打次"), userList);
    //第二个参数为如果数据有日期类型时是否传入转换格式,不传默认为yyyy-MM-dd
    let str1 = JSONUtil.toJSONString(person,DateConst.YMD_HLINE_HMS);
    let p = JSONUtil.parseObject<Person>(str1,DateConst.YMD_HLINE_HMS);
     let listStr = JSONUtil.toJSONString(userList);
     let uList = JSONUtil.parseArray<User>(listStr);
     uList.forEach(item => {
       Logger.error(item.id, item.name);
     })
parseStringArray 将字符串格式Array转换成Array数组
isBoolean 判断传入的字符串是否是布尔类型
isJSONStringArray 判断是否是字符串格式Array
isJSONString 判断是否是字符串格式json
isNumber 是否是字符串
efAxios封装需要大家共建和提出建议与需求,本版本为第一版本,暂时封装简单,后续逐渐完善传输整体加解密,关键字加解密,统一上传下载等,期待大家提出宝贵意见
后端Demo示例为Java开发,大家自行下载使用与阅读,如有问题请提出Issue
后端Demo示例地址点此访问
  /**
   * 是否整体传输加密 与关键字加密isAllEncrypt互斥 二者只能有其一为true
   */
  static isAllEncrypt: boolean = false;
  /**
   * 是否部分关键字传输加密 与整体传输加密互斥 二者只能有其一为true
   */
  static isPartEncrypt: boolean = false;
  /**
   * 关键字加密时的关键字集合
   */
  static keyWordsList: Array<string> = new Array<string>();
  /**
   * 用户自定义token的Key,默认为Authorization
   */
  static tokenName: string = 'Authorization';
  /**
   * 登录成功后的token值
   */
  static tokenValue: string = '';
  /**
   * 服务器 URL
   */
  static baseURL: string = '';
  /**
   * 请求头加密的SM2公钥
   */
  static sm2PubKey: string = '';
   /**
   *加解密接口忽略集合
   */
  static ignoreEncryptList: Array<string> = new Array<string>();
  /**
   * 是否将响应数据转换为OutDTO对象,默认为true,如业务后台返回无法转换则关闭(1.1.9+)
   */
  static isConvertDTO: boolean = true;
该变量为抛出的全局二次封装的全局axios对象,默认超时时间为10s
   //1.统一给请求头添加nonce防篡改校验因子,业务自行实现,如有需求也可在后续demo中完善
   //2.统一给请求头添加timestamp防重放的随机数因子,业务自行实现,如有需求也可在后续demo中完善
   //3.设置默认请求类型 application/json
   //4.添加统一的isAllEncrypt=true时整体加密,当前版本前端已完成,后端demo暂未完成,预计1.1.9前后可全部完善
   //5.添加统一的isPartEncrypt=true时根据关键字加密,当前版本前端已完成,后端demo暂未完成,预计1.1.9前后可全部完善
   //6.添加统一的请求头签名sign字段,当前版本前端已完成,后端demo暂未完成,预计1.1.9前后可全部完善
  //新增efAxiosParams.isConvertDTO来根据业务需要自行决定是否开启封装返回数据为OutDTO
  //目前只对返回数据格式做了统一的OutDTO转换
  //要求后端返回的数据格式包含OutDTO中的success,msg
  //dataRow和dataTable业务数据自行选择,非必填
该工具类提供统一简化各种请求方式,入参为json格式内部进行转换为所需对象
    //参数说明
    async post<F, E>(url: string, query: Record<string, Object>, headers?: Record<string, Object>): Promise<E>
    //url 为请求方法的url 全路径应该为 efAxiosParams.baseURL+url 组合而成
    //F 为请求入参对象,具体参照示例中的写法
    //E 为响应结果对象,格式为OutDTO<T> T为业务自定义对象
    //headers提供给如果当前请求需要额外设置headers请求头参数时使用,保持json格式
    //query 为JSON格式的请求参数key需要为字符串类型必须使用引号包裹 在方法内会将JSON转换为请求对象F,业务无需关心
    //参数说明 格式为  getXXXX/id/name/xxxx
    async get<E>(url: string): Promise<E>
    //url 为请求方法的url 全路径应该为 efAxiosParams.baseURL+url 组合而成
    //注意demo中的get请求为rest方式,即入参无需?param1=value,而是 get方法/param1/param2 以此类推
    //E 为响应结果对象,格式为OutDTO<T> T为业务自定义对象
    //参数说明   参数为json格式
    async getByParams<E>(url: string, params: Record<string, Object>): Promise<E>
    //url 为请求方法的url 全路径应该为 efAxiosParams.baseURL+url 组合而成
    //params表示get请求的入参妇科key:value格式
    //E 为响应结果对象,格式为OutDTO<T> T为业务自定义对象
    //参数说明
    async delete<E>(url: string): Promise<E>
    //url 为请求方法的url 全路径应该为 efAxiosParams.baseURL+url 组合而成
    //注意demo中的delete请求为rest方式,即入参方式为 delete方法/param1/param2 以此类推
    //E 为响应结果对象,格式为OutDTO<T> T为业务自定义对象
    //参数说明
    put<F, E>(url: string, query: Record<string, Object>): Promise<E>
    //url 为请求方法的url 全路径应该为 efAxiosParams.baseURL+url 组合而成
    //F 为请求入参对象,具体参照示例中的写法
    //E 为响应结果对象,格式为OutDTO<T> T为业务自定义对象
    //query 为JSON格式的请求参数key需要为字符串类型必须使用引号包裹 在方法内会将JSON转换为请求对象F,业务无需关心
    //参数说明
    async upload(url: string, isUri: boolean, progressCallBack: (process: number) => void, data?: ArrayBuffer, uri?: string, fileName?: string)
    //url 为请求方法的url 全路径应该为 efAxiosParams.baseURL+url 组合而成
    //progressCallBack 上传进度回调,具体参照示例中的写法
    //isUri  是否为uri文件
    //data  isUri=false时传入 表示上传的文件为ArrayBuffer格式
    //uri   isUri=true时传入  表示上传的文件为uri格式
    //fileName  上传时后端接收的key,默认为file
    //参数说明
    async download(url: string, filePath: string, progressCallBack: (process: number) => void)
    //url 为请求方法的url 全路径应该为 efAxiosParams.baseURL+url 组合而成
    //filePath  下载文件名称 如下载png图片后希望名称为girl.png
    //progressCallBack  下载进度回调方法
    //如果不需要响应数据转换为OutDTO则将efAxiosParams.isConvertDTO设置为false
    efAxiosParams.isConvertDTO = false;
    const loginNoDTO = await efClientApi.post<UserQuery,UserDTO>('/api/eftool/login', {
      'account': 'efadmin',
      'pwd': '123456'
    }, {
      'csxTest': '1212121212'
    });
    if (loginNoDTO.token) {
      ToastUtil.showToast('登录成功,token为:'+loginNoDTO.token);
    }
    //1.先设置统一的请求后端前缀 具体时机业务自行决定,Ability中也可
    efAxiosParams.baseURL = 'http://192.168.1.126:18088';
    //2.调用接口
    //模拟登录 UserQuery为请求参数,OutDTO<UserDTO>为响应的结果,OutDTO中的对象为业务自己创建
    const login = await efClientApi.post<UserQuery, OutDTO<UserDTO>>('/api/eftool/login', {
      'account': 'efadmin',
      'pwd': '123456'
    }, {
      'testAddHeader': '1212121212'   //此处表示当前请求会额外将testAddHeader添加到请求头中
    });
    //登录成功
    if (login.getSuccess()) {
      //登录成功将token赋值,后续需要,默认token的key为Authorization
      //如果需要更换业务调用efAxiosParams.tokenName = '业务自定义的token名称'
      efAxiosParams.tokenName = '如此处更换为efToken';
      efAxiosParams.tokenValue = login.getDataRow().token;
    } else {
      //登录失败
      ToastUtil.showToast(login.getMsg());
    }
      //模拟测试post请求  此时的请求头中已经存在token字段
      //UserQuery为请求参数,OutDTO<Record<string, Object>>为响应的结果,OutDTO中的对象为业务自己创建
      const post = await efClientApi.post<UserQuery, OutDTO<Record<string, Object>>>('/api/eftool/post', {
        'nickName': 'post请求参数',
        'name': '测试入参'
      });
      if (post.getSuccess()) {
        ToastUtil.showToast(JSONUtil.toJSONString(post.getDataRow()));
      }
      //模拟测试get请求
      //OutDTO<Record<string, Object>>为响应的结果,OutDTO中的对象为业务自己创建
      const get = await efClientApi.get<OutDTO<Record<string, Object>>>('/api/eftool/get/11111111');
      if (get.getSuccess()) {
        ToastUtil.showToast(JSONUtil.toJSONString(get.getDataRow()));
      }
      //模拟测试put请求
      //UserQuery为请求参数,OutDTO<Record<string, Object>>为响应的结果,OutDTO中的对象为业务自己创建
      const put = await efClientApi.put<UserQuery, OutDTO<Record<string, Object>>>('/api/eftool/put', {
        'id': '11111'
      });
      if (put.getSuccess()) {
        ToastUtil.showToast(JSONUtil.toJSONString(put.getDataRow()));
      }
      //模拟测试delete请求
      //OutDTO<Record<string, Object>>为响应的结果,OutDTO中的对象为业务自己创建
      const del = await efClientApi.delete<OutDTO<Record<string, Object>>>('/api/eftool/delete/1212133');
      if (del.getSuccess()) {
        ToastUtil.showToast(JSONUtil.toJSONString(del.getDataRow()));
      }
      //模拟文件上传
      async testUpload() {
          this.showDownBtn = Visibility.Visible;
          efAxiosParams.baseURL = 'http://192.168.1.126:18088';
          let ctx = getContext() as common.UIAbilityContext;
          let imageArray = await ctx.resourceManager.getMediaContent($r('app.media.notice').id);
          let imageResource = imageArray.buffer as ArrayBuffer;
          let res = await efClientApi.upload('/api/eftool/upload', false, (progress: number) => {
            if (progress >= 100) {
              this.showDownBtn = Visibility.None;
            }
            this.process = progress;
          }, imageResource);
          this.msg = res ? res["dataRow"] : '';
     }
      //模拟测试文件下载
      async testDownload() {
        efAxiosParams.baseURL = 'http://192.168.1.126:18088';
        this.showDownBtn = Visibility.Visible;
        let res = await efClientApi.download('/api/eftool/download/0d6a25e4-f61b-48eb-8a12-53f82c5b957d-default1715324534920.png', 'girl.png', (progress: number) => {
          if (progress >= 100) {
            this.showDownBtn = Visibility.None;
          }
          this.process = progress;
        });
        this.msg = res ? res["msg"] : '';
      }
  入参
  msg:提示消息
  options: {
    duration:'',
    bottom:'',
    showMode:0
  }  提示参数duration为显示时长,bottom为距离底部位置,showMode设置弹窗是否显示在应用之上0内,1上
  示例
  ToastUtil.showToast('提示信息');//使用默认参数
  ToastUtil.showToast('duration:4000,bottom:50vp', { duration: 4000, bottom: '50vp', showMode: 1 });//修改参数
    入參
    options: {
     title:标题默认为温馨提示,
     msg:提示消息,
     okText:确定按钮文本,
     cancelText:取消按钮文本,
     alignment:弹窗在竖直方向上的对齐方式,
     maskRect:弹窗遮蔽层区域,
     isModal:弹窗是否为模态窗口,
     offset:弹窗相对alignment所在位置的偏移量,
     okCallBack:确定按钮事件,
     cancelCallBack:取消按钮事件,不传入cancelCallBack则显示一个按钮
    }
    Button("dialog").margin({ bottom: '10vp' }).onClick(() => {
     DialogUtil.showDialog({
        msg: '这是一个弹框提示~~~~',
        okCallBack: this.ok,
        okText: '揍你',
        cancelText: '去吧',
        cancelCallBack: this.cancel
      });
    })
    Button("dialog一个按钮").margin({ bottom: '10vp' }).onClick(() => {
      DialogUtil.showDialog({
        msg: '不写cancelCallBack则显示一个按钮',
        okCallBack: this.test   //调用方法无需小括号()
      });
    })
    Button("dialog修改参数").margin({ bottom: '10vp' }).onClick(() => {
      DialogUtil.showDialog({
        msg: '这是一个弹框提示',
        okText: '同意',
        okCallBack: this.test, //调用方法无需小括号()
        cancelCallBack: this.cancel
      });
    })
    入參
    options
    {
     msg:警告消息,
     title:提示标题默认为(警告提示),
     subtitle:副标题,
     autoCancel:点击遮罩是否自动关闭默认为(false),
     alignment:弹框对齐方式默认为(底部Bottom),
     gridCount:宽度所占用栅格数默认为10,
     offset:弹窗相对alignment所在位置的偏移量,
     buttons:弹框按钮集合,
     maskRect:弹窗遮蔽层区域
    }
    buttons:AlertDialogBtn 弹框按钮类只允许有两个第一个为确认按按,第二个为取消按钮
    buttons的类型
    [
      {
        value:确定按钮文本默认为确定,
        fontColor:文本颜色默认为#fff,
        backgroundColor:背景颜色默认值为#409eff,
        callBack:确定按钮回调事件,
        enabled:点击Button是否响应,
        defaultFocus:设置Button是否是默认焦点,
        style:设置Button的风格样式
      },//确定按钮
      {
        value:取消按钮文本默认为取消,
        fontColor:文本颜色默认为#fff,
        backgroundColor:背景颜色默认值为#dcdfe6,
        callBack:取消按钮回调事件,
        enabled:点击Button是否响应,
        defaultFocus:设置Button是否是默认焦点,
        style:设置Button的风格样式
      }//取消按钮
    ]
    //使用默认参数
    DialogUtil.showAlertDialog({
      msg: "这个是一个,默认警告弹框",
      buttons: [
        { callBack: this.ok }
      ]
    });
    //使用自定义参数
   DialogUtil.showAlertDialog({
     msg: "这个是一个警告弹框",
     title: '标题',
     alignment: DialogAlignment.Top,
     buttons: [
       { callBack: this.ok, style: DialogButtonStyle.HIGHLIGHT },
       { callBack: this.cancel }
     ]
   });
    入參
    options: {
      title:标题 默认为温馨提示,
      btn:需要显示的菜单项,最大支持6个,
      showInSubWindow:某弹框需要显示在主窗口之外时,是否在子窗口显示此弹窗,
      isModal:弹窗是否为模态窗口,模态窗口有蒙层,非模态窗口无蒙层
    }
    Buttons:{
      text:菜单项标题
      color:菜单项颜色
      btnCallBack:点击菜单项对应触发的事件
    }
    //使用默认参数
    ActionUtil.showActionMenu({ btn: [
      { text: '测试1', color: '#cdcdcd', btnCallBack: this.can },
      { text: '测试2', color: '#108ee9', btnCallBack: this.two }
    ]});
    //使用自定义参数
    ActionUtil.showActionMenu({ title: '修改后的标题', btn: [
      { text: '测试1', color: '#cdcdcd', btnCallBack: this.can },
      { text: '测试2', color: '#108ee9', btnCallBack: this.two }
    ] });
    入參
    options: {
      title:标题,
      btn:菜单字符串数组 最多6个,
      clickCallBack:点击菜单回调函数,默认传回当前点击菜单项,
      showInSubWindow:某弹框需要显示在主窗口之外时,是否在子窗口显示此弹窗
      isModal:弹窗是否为模态窗口,模态窗口有蒙层,非模态窗口无蒙层
    }
    //使用默认参数
    Button("actionMenu默认标题").margin({ bottom: '10vp' }).onClick(() => {
      ActionUtil.showMenu({btn:["菜单1","菜单2"],clickCallBack:(data)=>{
        ToastUtil.showToast(data);
      }})
    })
    //使用自定义参数
    Button("actionMenu修改标题").margin({ bottom: '10vp' }).onClick(() => {
      ActionUtil.showMenu({title:'修改了菜单标题',btn:["菜单1","菜单2"],clickCallBack:(data)=>{
        ToastUtil.showToast(data);
      }})
    })
    入參
    options: {
      title:提示可不填,
      msg:内容可不填,
      subtitle:副标题,
      autoCancel:点击遮障层时,是否关闭弹窗,
      offset:弹窗相对alignment所在位置的偏移量,
      maskRect:弹窗遮蔽层区域,在遮蔽层区域内的事件不透传,在遮蔽层区域外的事件透传,
      showInSubWindow:某弹框需要显示在主窗口之外时,是否在子窗口显示此弹窗,
      isModal:弹窗是否为模态窗口,模态窗口有蒙层,非模态窗口无蒙层,
      alignment:弹框对齐方式默认为(底部Bottom),
      sheets:列表项字符串数组,
      clickCallBack:点击列表项回调事件,默认传回选中的当前项,
      backgroundColor:弹窗背板颜色,
      backgroundBlurStyle:弹窗背板模糊材质
    }
    //使用默认参数
     Button("列表选择弹窗默认参数").margin({ bottom: '10vp' }).onClick(() => {
       ActionUtil.showActionSheet({
         sheets: ["1", "2", "3", "4", "5", "6", "7", "8", "9", "10"],
         clickCallBack: (data: string) => {
           ToastUtil.showToast(data);
         } });
     })
    //使用自定义参数
    Button("列表选择弹窗修改参数").margin({ bottom: '10vp' }).onClick(() => {
      ActionUtil.showActionSheet({
        title:'弹框的标题',
        msg:'弹框的消息',
        subtitle:'副标题',
        alignment:DialogAlignment.Top,
        sheets: ["1", "2", "3", "4", "5", "6", "7", "8", "9", "10"],
        clickCallBack: (data: string) => {
          ToastUtil.showToast(data);
        } });
    })
    LoadOptions 全局加载入参实体
    options:{
        show:是否显示默认false,
        content:加载提示内容默认正在拼命加载中,请稍后...,
        showInSubWindow:是否显示在主窗口之外默认false,
        alignment:弹窗在竖直方向上的对齐方式默认Center,
        offset:弹窗相对alignment所在位置的偏移量默认Bottom相关y:-20,Top相关y:50
    }
    @State showLoading: boolean = false;
    在build中初始化该组件,show接收一个@State修饰符修饰的boolean变量
    LoadingUtil({
       options: { show: this.showLoading, alignment: DialogAlignment.Top, content: '更改了加载提示...' }
    });
    在需要显示的地方更改变量值,如发起一个axios请求时
    this.showLoading = true;
    在需要关闭的地方更改变量值,如axios请求成功返回结果时
    this.showLoading = false;
    Button("显示全局loading").margin({ bottom: '10vp' }).onClick(() => {
       this.showLoading = true;
       setTimeout(() => {
         this.showLoading = false;
       }, 3000);
    })
    TipsOptions 提示框入参实体
    options:{
        show:是否显示默认false,
        title:提示框标题默认温馨提示,
        content:提示框内容,
        checkTips:checkbox的提示内容默认不再提醒,
        btnList:按钮字符串数组默认['同意','取消']
        clickCallBack:点击弹框按钮回调函数,
        alignment:弹窗在竖直方向上的对齐方式默认Center,
        offset:弹窗相对alignment所在位置的偏移量默认Bottom相关y:-20,Top相关y:50
    }
    @State showTips: boolean = false;
    在build中初始化该组件,show接收一个@State修饰符修饰的boolean变量
    TipsUtil({
      options: {
        show: this.showTips,
        content: '请仔细阅读请仔细阅读请仔细阅读请仔细阅读请仔细阅读请仔细阅读请仔细阅读请仔细阅读请仔细阅读xxxxxxxxxxxxxxxxxxxxxxxxxxxxxxxxx',
        clickCallBack: (index, isChecked) => {
          ToastUtil.showToast(index === 0 ? '点击了第一个按钮' + isChecked : '点击了第二个按钮' + isChecked);
          this.showTips = false;
        }
      }
    });
    clickCallBack中的两个入参
    1.index为点击按钮的下标,0为点击第一个按钮,1为点击第二个按钮
    2.isChecked为checkbox是否选中,选中为true
    在需要显示的地方更改变量值,如提示用户授权
    this.showTips = true;
    在回调成功事件中关闭
    clickCallBack: (index, isChecked) => {
       this.showTips = false;
    }
    Button("显示Tips").margin({ bottom: '10vp' }).onClick(() => {
      this.showTips = true;
    })
    SelectOptions 选择框入参实体
    options:{
        show:是否显示默认false,
        title:选择弹出框标题,
        content:选择弹出框内容,
        btnTxt:按钮字符串,
        ctxList:选项内容数组
        clickCallBack:点击弹框按钮回调函数,
        alignment:弹窗在竖直方向上的对齐方式默认Center,
        offset:弹窗相对alignment所在位置的偏移量默认Bottom相关y:-20,Top相关y:50
    }
    @State showSelect: boolean = false;
    在build中初始化该组件,show接收一个@State修饰符修饰的boolean变量
    SelectUtil({
      options: {
        show: this.showSelect,
         ctxList: ['苹果', '香蕉', '梨', '哈密瓜','凤梨','西瓜','火龙果','伊丽莎白'],
         clickCallBack: (selectData) => {
           //点击按钮时也会触发该回调,返回值为'',故需要判断当返回值不为空时进行业务操作
           if (selectData) {
             ToastUtil.showToast('选择了' + selectData);
           }
           this.showSelect = false;
         }
      }
    })
    clickCallBack中的入参
    1.selectData为点击选择的内容项
    在需要显示的地方更改变量值,如提示用户授权
    this.showSelect = true;
    在回调成功事件中关闭
    clickCallBack: (selectData) => {
       //点击按钮时也会触发该回调,返回值为'',故需要判断当返回值不为空时进行业务操作
       if (selectData) {
         ToastUtil.showToast('选择了' + selectData);
       }
       this.showSelect = false;
    }
    Button("显示Select").margin({ bottom: '10vp' }).onClick(() => {
      this.showSelect = true;
    })
    ConfirmOptions 信息确认框入参实体
    options:{
        show:是否显示默认false,
        title:提示框标题默认操作确认,
        content:提示框内容,
        checkTips:checkbox的提示内容默认禁止后不再提醒,
        btnList:按钮字符串数组默认['禁止','允许']
        clickCallBack:点击弹框按钮回调函数,
        alignment:弹窗在竖直方向上的对齐方式默认Center,
        offset:弹窗相对alignment所在位置的偏移量默认Bottom相关y:-20,Top相关y:50
    }
    @State showConfirm: boolean = false;
    在build中初始化该组件,show接收一个@State修饰符修饰的boolean变量
    ConfirmUtil({
      options: {
        show: this.showConfirm,
        title: '这个是提示',
        content: '确认要禁止定位权限么?',
        clickCallBack: (index, isChecked) => {
          ToastUtil.showToast(index === 0 ? '点击了第一个按钮' + isChecked : '点击了第二个按钮' + isChecked);
          this.showConfirm = false;
        }
      }
    })
    clickCallBack中的两个入参
    1.index为点击按钮的下标,0为点击第一个按钮,1为点击第二个按钮
    2.isChecked为checkbox是否选中,选中为true
    在需要显示的地方更改变量值,如提示用户授权
    this.showConfirm = true;
    在回调成功事件中关闭
    clickCallBack: (index, isChecked) => {
       this.showConfirm = false;
    }
    Button("显示Conform").margin({ bottom: '10vp' }).onClick(() => {
      this.showConfirm = true;
    })
    AlertOptions 操作确认框入参实体
    options:{
        show:是否显示默认false,
        content:提示框内容,
        btnList:按钮字符串数组默认['确认','取消']
        clickCallBack:点击弹框按钮回调函数,
        alignment:弹窗在竖直方向上的对齐方式默认Center,
        offset:弹窗相对alignment所在位置的偏移量默认Bottom相关y:-20,Top相关y:50
    }
    @State showAlert: boolean = false;
    在build中初始化该组件,show接收一个@State修饰符修饰的boolean变量
    AlertUtil({
      options: {
        show: this.showAlert,
        content: '这是一个警告弹出框',
        clickCallBack: (index) => {
          ToastUtil.showToast(index === 0 ? '点击了第一个按钮' : '点击了第二个按钮');
          this.showAlert = false;
        }
      }
    })
    clickCallBack中的入参
    1.index为点击按钮的下标,0为点击第一个按钮,1为点击第二个按钮
    在需要显示的地方更改变量值,如提示用户授权
    this.showAlert = true;
    在回调成功事件中关闭
    clickCallBack: (index) => {
       this.showAlert = false;
    }
    Button("显示Alert").margin({ bottom: '10vp' }).onClick(() => {
      this.index = true;
    })
PromOptions 异常提示框入参实体
options:{
show:是否显示默认false,
content:提示框内容,
actionText:指定当前异常提示的右侧图标按钮的文字,
clickCallBack:点击弹框按钮回调函数
}
@State showException: boolean = false;
在build中初始化该组件,show接收一个@State修饰符修饰的boolean变量
ExceptionUtil({
options: {
show: this.showException,
clickCallBack: (index) => {
//index为0表示点击了左侧文字,为1表示点击了右侧图标,根据情况进行业务处理
ToastUtil.showToast("点击了" + index);
this.showException = false;
}
}
})
clickCallBack中的入参
1.index为0表示点击了左侧文字,为1表示点击了右侧图标,根据情况进行业务处理
在需要显示的地方更改变量值,如网络异常
this.showException = true;
在回调成功事件中关闭
clickCallBack: (index) => {
this.showException = false;
}
Button("显示Exception").margin({ bottom: '10vp' }).onClick(() => {
this.showException = true;
})
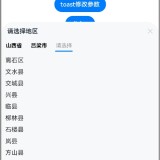
入参
show 是否显示级联框(TRUE显示FALSE关闭)
callCity 反回选择的省市区数据
//使用demo
Button("级联菜选择器").margin({ bottom: '10vp' }).onClick(() => {
this.show = !this.show;
})
Cascade({ show: $show, callCity: $callCity })
//$callCity为调用页面传入给子组件的用于接收返回的值
在EntryAbility中的onWindowStageCreate中进行初始化和设置
onWindowStageCreate(windowStage: window.WindowStage): void {
//1.初始化
let imm = new ImmersionUtil();
windowStage.loadContent('pages/Index', (err, data) => {
//2.调用沉浸式设置方法
imm.immersiveWindow(windowStage);
if (err.code) {
hilog.error(0x0000, 'testTag', 'Failed to load the content. Cause: %{public}s', JSON.stringify(err) ?? '');
return;
}
hilog.info(0x0000, 'testTag', 'Succeeded in loading the content. Data: %{public}s', JSON.stringify(data) ?? '');
});
}
//参数详解
{
windowStage:窗口对象,
isLayoutFullScreen:是否开启全屏显示,默认true,
hiddenBar:是否隐藏底部导航,默认false,当为true时页面无需避让,
color:窗口背景颜色,默认值为白色
}
//本示例主要讲解hiddenBar为false时避让区设置
//在初始化时已经向AppStorage中存入了变量bottomHeight,作为避让高度
//在需要避让的页面中获取存入的值设置bottom即可
//获取存入的应用变量
bottomRectHeight: string = AppStorage.get<number>('bottomHeight') + 'px';
//设置给对应的外层容器组件即可
.margin({ bottom: this.bottomRectHeight })
WinOptions 窗口工具入参实体
options:{
name:窗口名称默认eftool,
windowType:窗口类型默认TYPE_DIALOG,
contentRouter:窗口要显示的路由如:pages/Welcome需要在main_pages.json中声明,
bgColor:窗口背景颜色默认#33606266,
callBack:窗口创建回调函数
}
在需要弹出窗口的页面创建弹出方法
async openWin() {
await WindowUtil.createWindow({
contentRouter: 'pages/Welcome',
callBack:()=>{
//此处如果创建完窗口有业务需求则自定义
ToastUtil.showToast('窗口已创建~');
}
})
}
//在需要关闭弹窗的时候调用,如在弹窗内处理完需求后关闭
WindowUtil.closeWindow();
Button("打开窗口").margin({ bottom: '10vp' }).onClick(() => {
this.openWin();
})
//Welcome页面
Button('关闭弹窗').margin({ top: 20 }).onClick(() => {
WindowUtil.closeWindow();
})
NoticeOptions 通知入参实体类
options:{
id:通知ID默认生成,
isOngoing:是否进行时通知默认true,
isStopwatch:是否显示已用时间默认true,
label:通知标签默认eftool,
title:通知标题默认来自eftool通知,
text:通知内容,
additionalText:通知附加内容默认'',
longText:通知的长文本/多行的文本用英文逗号分割(多行文本时记得用逗号分隔),
briefText:通知概要内容默认概要内容,
expandedTitle:通知展开时的标题默认展开标题,
picture:图片,
callBack:业务回调函数
}
在需要发送通知的业务中调用 index为-1表示禁止,1表示已授权
await NotificationUtil.authorizeNotification((index: number) => {
ToastUtil.showToast(index > 0 ? '已经授予通知权限' : '用户禁止授权,请用户在设置中操作');
});
//在需要推送普通通知时调用,具体参数如图,下方为全量参数,具体根据业务自行选择,text为必填,其余均有默认值
await NotificationUtil.publishBasic({
text: '推送通知内容!!!!!!!!!!!!!!!!!!!!',
title: '抢票时间到',
additionalText: '这个是additionalText',
isOngoing:true,
isStopwatch:true,
label:'普通通知',
callBack: (noticeId: number) => {
ToastUtil.showToast('通知推送成功:' + noticeId);
}
})
//在需要推送多文本通知时调用,具体参数如图,下方为全量参数,具体根据业务自行选择,longText为必填,其余均有默认值用英文逗号分隔
await NotificationUtil.publishMultiLine({
text: '推送通知内容!!!!!!!!!!!!!!!!!!!!',
title: '抢票时间到',
additionalText: '这个是additionalText',
expandedTitle: '多文本的展开',
briefText: '多文本的概要',
longText: '第一行的内容,第二行的内容,第三行的内容,第四行的内容,第无行的内容',
isOngoing:true,
isStopwatch:true,
label:'普通通知',
callBack: (noticeId: number) => {
ToastUtil.showToast('通知推送成功:' + noticeId);
}
})
//在需要推送长文本通知时调用,具体参数如图,下方为全量参数,具体根据业务自行选择,longText为必填,其余均有默认值
await NotificationUtil.publishLongText({
text: '推送长文本内容!!!!!!!!!!!!!!!!!!!!',
title: '抢票时间到11111111111',
longText: '展出差出差出差出差展出差出差出差出差展出差出差出差出差展出差出差出差出差展出差出差出差出差展出差出差出差出差展出差出差出差出差展出差出差出差出差展出差出差出差出差展出差出差出差出差展出差出差出差出差',
expandedTitle: '展开的副标题',
briefText: '这个是概要',
isOngoing:true,
isStopwatch:true,
label:'长文本通知',
callBack: (noticeId: number) => {
ToastUtil.showToast('通知推送成功:' + noticeId);
}
})
//在需要推送长文本通知时调用,具体参数如图,下方为全量参数,具体根据业务自行选择,均有默认值
await NotificationUtil.publishPicture({
text: '222222',
title: '抢票时间到',
expandedTitle: '多文本的展开',
briefText: '多文本的概要',
isOngoing: true,
isStopwatch: true,
label: '图片通知',
picture: await image.createImageSource((getContext(this) as common.UIAbilityContext).resourceManager.getMediaContentSync($r("app.media.startIcon"))
.buffer).createPixelMap(),
callBack: (noticeId: number) => {
ToastUtil.showToast('通知推送成功:' + noticeId);
}
})
NotificationUtil.readOrRemoveNotice(want);
//在需要取消的时候调用,传入通知id
NotificationUtil.cancelNotice(10011, () => {
ToastUtil.showToast('取消通知成功~');
});
NotificationUtil.clearBadge();
NotificationUtil.clearNotice();
//角标更新需要在UIAbility的onNewWant中处理,默认的为EntryAbility页面中
/**
* 监听通知传入的want
* @param want
* @param launchParam
*/
onNewWant(want: Want, launchParam: AbilityConstant.LaunchParam): void {
NotificationUtil.readOrRemoveNotice(want);
}
//注意APPROXIMATELY_LOCATION和LOCATION权限需要配置到项目的module.json5文件的requestPermissions中
//需要获取用户当前定位的中文位置信息时调用,返回格式如北京市海淀区xxx街道xxxx号
let result = await LocationUtil.getGeoLocation();
this.message = result.getDataRow();
//已有详细地址需要编码为坐标信息时调用
let res = await LocationUtil.address2Location('北京市顺义区后沙峪裕祥花园');
this.message = res.getDataRow().latitude + '-------' + res.getDataRow().longitude;
//已知经纬度,需要获取中文地理位置描述时调用
let result = await LocationUtil.geoConvert(40.102248232795134, 116.54190501929297);
if (result.placeName) {
this.message = result.placeName;
}
//在需要获取当前国家编码时调用
let res = await LocationUtil.getCountryCode();
this.message = res.getDataRow();
//方法
async geoLocation() {
let result = await LocationUtil.getGeoLocation();
this.message = result.getDataRow();
}
async add2location() {
let res = await LocationUtil.address2Location('北京市顺义区后沙峪裕祥花园');
this.message = res.getDataRow().latitude + '-------' + res.getDataRow().longitude;
}
async geoConvert() {
let result = await LocationUtil.geoConvert(40.102248232795134, 116.54190501929297);
if (result.placeName) {
this.message = result.placeName;
}
}
async getCountryCode() {
let res = await LocationUtil.getCountryCode();
this.message = res.getDataRow();
}
//UI
Button('获取当前定位').margin({ bottom: '10vp' }).onClick(() => {
this.geoLocation();
})
Button('根据经纬度获取Location信息').margin({ bottom: '10vp' }).onClick(() => {
this.geoConvert();
})
Button('根据地理位置获取定位信息').margin({ bottom: '10vp' }).onClick(() => {
this.add2location();
})
Button('获取国家码').margin({ bottom: '10vp' }).onClick(() => {
this.getCountryCode();
})
//入参介绍
progressState:是否显示进度按钮
halfProgress:当前下载进度
ctx:进度按钮文字提示
//UI中引入
DownloadUtil({
progressState: this.showDownBtn,
halfProgress: this.process,
ctx: this.btnCtx
})
Button('上传文件').margin({ top: 20 }).onClick(() => {
this.btnCtx = '上传文件中...';
this.testUpload();
})
async testUpload() {
//显示进度按钮
this.showDownBtn = Visibility.Visible;
let res = await efClientApi.upload('/api/eftool/upload', false, (progress: number) => {
if (progress >= 100) {
//上传完毕隐藏进度按钮
this.showDownBtn = Visibility.None;
}
//设置当前进度
this.process = progress;
}, imageResource);
}
Button('下载文件').margin({ top: 20 }).onClick(() => {
this.btnCtx = '下载文件中...';
this.testDownload();
})
async testDownload() {
//显示进度按钮
this.showDownBtn = Visibility.Visible;
let res = await efClientApi.download('/api/eftool/download/0d6a25e4-f61b-48eb-8a12-53f82c5b957d-default1715324534920.png', 'girl.png', (progress: number) => {
if (progress >= 100) {
//下载完毕隐藏进度按钮
this.showDownBtn = Visibility.None;
}
//设置当前进度
this.process = progress;
});
}
options: {
suffixList:选择文件的后缀类型,【只在选择文档时需要】
maxNumber:选择文档的最大数目,【在选择文档和照片时需要】
selectMode:选择模式是文件还是目录,【只在选择文档时需要】
isMultiSelect:是否多选联系人,【只在选择联系人时需要】
selectCallBack:选择完成回调【回调方式方法时需要】
}
let bufferImg: ArrayBuffer = new ArrayBuffer(40960000);
//拉起选择文件
await PickerUtil.selectFile({
selectCallBack:(list)=>{
//此处只是举例操作
list.forEach(item => {
let fileUriObject = new fileUri.FileUri(item);
name = fileUriObject.name;
let file = fs.openSync(item, fs.OpenMode.READ_ONLY);
let readLen = fs.readSync(file.fd, bufferImg);
fs.closeSync(file);
})
}
});
//拉起选择文件
let result = await PickerUtil.selectFile();
let bufferImg: ArrayBuffer = new ArrayBuffer(40960000);
//判断是否成功
if (result.getSuccess()) {
let list = result.getDataTable();
list.forEach(item => {
//此处只是举例操作
let fileUriObject = new fileUri.FileUri(item);
name = fileUriObject.name;
let file = fs.openSync(item, fs.OpenMode.READ_ONLY);
let readLen = fs.readSync(file.fd, bufferImg);
fs.closeSync(file);
})
}
let bufferImg: ArrayBuffer = new ArrayBuffer(40960000);
//拉起照片和视频选择
await PickerUtil.selectAudioCallBack({
selectCallBack:(list)=>{
//此处只是举例操作
list.forEach(item => {
let fileUriObject = new fileUri.FileUri(item);
name = fileUriObject.name;
let file = fs.openSync(item, fs.OpenMode.READ_ONLY);
let readLen = fs.readSync(file.fd, bufferImg);
fs.closeSync(file);
})
}
});
//拉起选中照片
let result = await PickerUtil.selectPhotoVideo();
let bufferImg: ArrayBuffer = new ArrayBuffer(40960000);
//判断是否成功
if (result.getSuccess()) {
let list = result.getDataTable();
list.forEach(item => {
//此处只是举例操作
let fileUriObject = new fileUri.FileUri(item);
name = fileUriObject.name;
let file = fs.openSync(item, fs.OpenMode.READ_ONLY);
let readLen = fs.readSync(file.fd, bufferImg);
fs.closeSync(file);
})
}
//拉起选择音频picker
let bufferImg: ArrayBuffer = new ArrayBuffer(409600000);
await PickerUtil.selectAudioCallBack({
selectCallBack:(list)=>{
//此处只是举例操作
list.forEach(item => {
let fileUriObject = new fileUri.FileUri(item);
name = fileUriObject.name;
let file = fs.openSync(item, fs.OpenMode.READ_ONLY);
let readLen = fs.readSync(file.fd, bufferImg);
fs.closeSync(file);
})
}
})
/拉起选择音频
let result = await PickerUtil.selectAudio();
let bufferImg: ArrayBuffer = new ArrayBuffer(409600000);
//判断是否成功
if (result.getSuccess()) {
let list = result.getDataTable();
list.forEach(item => {
//此处只是举例操作
let fileUriObject = new fileUri.FileUri(item);
name = fileUriObject.name;
let file = fs.openSync(item, fs.OpenMode.READ_ONLY);
let readLen = fs.readSync(file.fd, bufferImg);
fs.closeSync(file);
})
}
//拉起选择联系人picker 默认多选
let result = await PickerUtil.selectContact();
if (result.getSuccess()) {
let list = result.getDataTable();
let str = JSONArray.toJSONString(list);
this.msg = str;
}
let bufferImg = new ArrayBuffer(40960000);
//调起拍照
let res = await CameraUtil.picker();
if (res.getSuccess()) {
//此处只是举例操作
let str = res.getDataRow().resultUri;
let fileUriObject = new fileUri.FileUri(str);
let name = fileUriObject.name;
let file = fs.openSync(str, fs.OpenMode.READ_ONLY);
fs.closeSync(file);
}
efAlertOptions 弹出框入参实体
options:{
title:提醒标题默认为温馨提示,
content:提示框内容,
okText:确认文本默认为确认,
cancelText:取消文本默认为取消,
okCallBack:确认回调函数,
cancelCallBack:取消回调函数
}
在需要显示的地方调用
await WinDialogUtil.showAlert({
title: 'ef温馨提示',
content: '只设置了内容,其他都默认~~~~~',
okCallBack:this.aes,
cancelCallBack:this.testJSONObject
});
点击确认和取消按钮均会自动关闭提示框
//拉起选择文件
let result = await PickerUtil.selectFile();
//判断是否成功
if (result.getSuccess()) {
let list = result.getDataTable();
let item = list[0];
await PreviewUtil.previewTxt(item);
}
//拉起选择文件
let result = await PickerUtil.selectFile();
//判断是否成功
if (result.getSuccess()) {
let list = result.getDataTable();
let item = list[0];
await PreviewUtil.previewHtml(item);
}
//拉起选择文件
let result = await PickerUtil.selectPhotoVideo();
//判断是否成功
if (result.getSuccess()) {
let list = result.getDataTable();
let item = list[0];
await PreviewUtil.previewImage(item);
}
//拉起选择文件
let result = await PickerUtil.selectPhotoVideo();
//判断是否成功
if (result.getSuccess()) {
let list = result.getDataTable();
let item = list[0];
await PreviewUtil.previewVideo(item);
}
//拉起选择文件
let result = await PickerUtil.selectAudio();
//判断是否成功
if (result.getSuccess()) {
let list = result.getDataTable();
let item = list[0];
await PreviewUtil.previewAudio(item);
}
eftool希望您可以动一动小手点点小⭐⭐
此处可能存在不合适展示的内容,页面不予展示。您可通过相关编辑功能自查并修改。
如您确认内容无涉及 不当用语 / 纯广告导流 / 暴力 / 低俗色情 / 侵权 / 盗版 / 虚假 / 无价值内容或违法国家有关法律法规的内容,可点击提交进行申诉,我们将尽快为您处理。
1. 开源生态
2. 协作、人、软件
3. 评估模型


